Time check: 2.18am
When was the last time i updated my blog? Decade!
Reading through my old blog posts makes me cringe so bad but still enjoyed reading them. haha
I am currently unemployed ever since august, 2016, looking after my mum. It was definitely hard, i swear. Going through a tight financial and my income comes from my dad and sister. $200 monthly is all i got. Been delaying some payments since September and i can't tolerate this any longer. Debt around your waist is not a fun feeling y'know.
so basically, I did the whole housewife job even though getting some rest in between and no rush in doing house chores but trust me, it's not as tiring as working in retail line. Stood for hours long ain't a issue to me, store cleaning, non stop talking to your customers and colleagues, climbing up and down the ladder, load and unload stocks. Still can't beat the tiredness of being a housewife. lol. Being a full time 'housewife' can make me go crazy especially having a younger brother who never cooperates. Now i know the reason why my mum stop cleaning the house everyday but instead weekly or perhaps every two weeks. From laundry, cooking, sweep/mop, showered my mum, dump the rubbish every now and then. I did them myself. It's not as simple as what you think it is
And i doubt no one wants to have a brother like mine. Peed all around the toilet seats without washing it away (he sometimes didn't flush), whatever snacks that comes together with the wrapper he'll just left it on the table, he don't wash his own plates and mugs, whats more pots and pans that he had used, had the habits of wetting the floor. God know how many times we family almost slipped. Such a useless bitch. Task is slightly simple, but when he's around, it gets hard, harder, hardest. you ladies feel me????
I'm at the verge of giving up cause my mind is going to explode pretty much soon. So before i get myself into stages of depression, i did rather start looking for a job and eventually i did today. I've been sending out my resumes to selected companies hoping to get a invitation for an interview. haha.
Well, i have not yet discuss with my dad but i did with my sis. My suggestion is to get a part time maid to clean the house and look after my mum. But i know my dad won't agree to my idea. I'll let him think on his own, what best for mum but i ain't not going to involve anymore cause like i've said earlier, i have debts to settle. I know i'm being selfish but i'm not the only child in this family, your siblings should play their part too😊
Goodnight👋
Monday, August 13
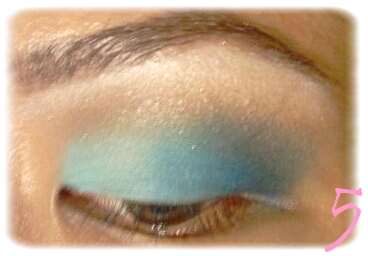
TU RQ UO IS E BL UE
I'm bored yet lazy, but this itchy finger wants to play around with makeup so i did mixture of Turquoise, blue and very light shimmery brown. Kinda regret adding the shimmery brown, it turns out a little but too much as i had shimmer white under my matte white eyeshadow.
Wouldn't want to elaborate too much. Let's get started !
 I've already primed my whole eyelid. I used white shimmer liner as a white base all over my eyelid cause i'm gonna used cheap palette which i have to re-apply couple of times till i get satisfy with the colors.
 I deleted second and third steps not on purpose.
- Again i apply white liner on my brow bone as base and white eyeshadow on top as my highlight.
- Starting from my inner corner, i apply light turquoise color and stop in the middle of my lid. Then i apply a lil bit darker turquoise on to 3/4 starting from the middle. Let a little bit space at the outer corner empty.
 This picture can't see clearly. But what i did was, i apply black base at outer corner. Don't worry if it reaches out from where it supposed to stop. You can always clean up with make up remover.
 This is what i'm talking about. You can see where's my eyeshadow ends when it supposed to stop right at the end of my eye.
I don't want to use black so i apply Ocean blue color on top of the black base just so it looks darker.
 Shimmery brown on crease as well as blend the harsh lines in back and forth motion. I re-apply the highlights.
I cleaned both side of my eyes, eye liner, mascara and I'M DONE!

Wouldn't want to elaborate too much. Let's get started !


- Again i apply white liner on my brow bone as base and white eyeshadow on top as my highlight.
- Starting from my inner corner, i apply light turquoise color and stop in the middle of my lid. Then i apply a lil bit darker turquoise on to 3/4 starting from the middle. Let a little bit space at the outer corner empty.


I don't want to use black so i apply Ocean blue color on top of the black base just so it looks darker.
I cleaned both side of my eyes, eye liner, mascara and I'M DONE!

See how i draw my eyeliner. Daanng! The applicator is so fine that i can't and don't know how to control. See la. I da give up. Furthermore, i'm not going out.
Thursday, August 9
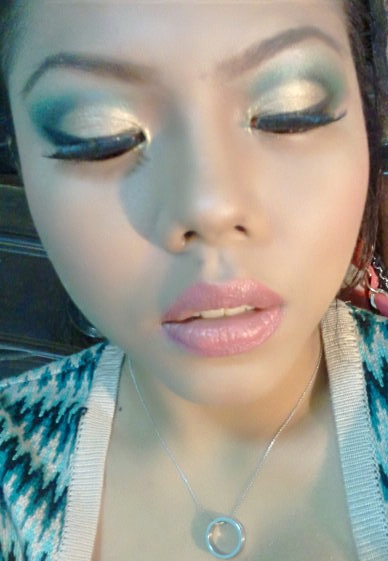
S I L V E R, R E D, G R E E N & B L A C K
Hey Ladies! I'm back for another my make up sharing.
I can't really remember who inspired me for this eye look. But it's really a eye catching for me. I still remember clearly how the tutorial goes. So i decided to try out... Not at myself this time, BUT a friend of mine who agreed to let me mess up her face. Thank you Nisa. Oh well, i won't share on what products or brands i'm using. You can just used your own as long as color wise are the same or almost. Up to you.
So as usual, i started out with priming her eyelid then goes on with applying silver eyeshadow to quarter of her eyelids.
I then applied black eyeshadow at the outer lids and bring it in a little just so there's no harsh lines between silver and black.
I used small fluffy brush and with red, i apply it right onto her crease with back and forth motion. It helps to blend the black and silver harsh lines as well.
That's not the end. I dapped green color on top of black just so it look a little bit brighter. And blend between green and red. Don't forget to highlight underneath your brow!

.jpg)

Well i hope you ladies like it. I wanna do 'Hari Raya' look and share it with you. Should i ? Hmmm.. Okay so before i end this i would like to share something with you.
Recently, I received mailed from Essence cosmetics. I received a two different duo eyeshadow, mascara, liquid eyeliner, jumbo pencil lipstick and lip gloss.

I tried on their eyeliner, mascara and a duo brown and cream color eyeshadow. The eyeshadow above are all shimmery and non are matte. Could not expect better for a cheap products right? Err.. No. I got it for free! haha. But i like the water eyeliner tho'. It doesn't creased on me but it's not waterproof. Sad.
Sunday, June 3
S K I N C A R E D A I L Y R O U T I N E
I'm not a skincare freak, if you wanna know. I'm just searching for some affordable products that works for my face. Who doesn't want their face to look flawless and no discoloration problems without their make up on ?
I had a oily skin all over my face especially on my T-zone area if you wanna know. Which means i have to get my skin care that has related to it. I've tried on several facial wash as well as moisturizer depending on my budget. But most of face products that I've used aren't that pricey. I doubt you can get the same as mine.

I've been using Apricot scrub since i was 15yrs old if i'm not mistaken. It controls black head as well as blemishes. A bit harsh scrub but it feels like i'm getting all the impurities away. I'd be scrubbing hard especially underneath my lips, on my eyebrow and at the side of my nose area. The feeling after scrubbing are awesome! But i uses them once or twice a week.
So the rest of the days i will use a few other facial wash which are either Cetaphil Gentle Skin Cleanser or L'Oreal RevitaLift Anti Wrinkle Milk Foam.

I read many good reviews on Cetaphil products. As you know, they have numbers of range and so i choose skin cleanser as the first start out. It's soap free and i don't really like it. After all, i uses this mostly as my make-up remover. It works well though. I know! I should grab the oil-free cleanser instead right?! Much pricey than this one with lesser amount of products. ( Singaporean )
I stop using toner back then after i ran out of cotton pads. Although i knew my sister have tons of it, i still skipped using those. I don't know why but i find it troublesome. Furthermore, it absorbed away the toner and ended up having to use a lot more. Don't you think so? Heh.The purpose of toner is to ;
- Adjust skin's PH balance (which is a good thing)
- Let skin care serum or cream absorbed better
- Removes remaining dirt that your cleanser may have missed
You don't have to skipped this step like i do. This is my skin care routine.
I then proceed to Moisturizer. I LOVE MOISTURIZER! I need them before i start putting on foundation. Foundation does not gives me soft and dewy looking but it's actually having skin that is moisture rich.

I had 3 different cheap moisturizer that i'm using currently which are Himalaya, Eversoft and Hazeline.
I kinda regret getting the yellow Hazeline cause it's not like a normal cream but you have to force your finger a bit in to get the sufficient amount. But it eventually melt and gives you matte looking after applying. It has rose smell to it that reminds me of the oldies. heh.
Another both of the products works well on me. It doesn't gives me any problem. The scent wise as well as soft feeling after applying. *thumbs up*
Sunday, May 13
S I L V E R B R O N Z E E Y E L O O K
I blog less ever since i started working. Bare with me, I'm trying my best to blog whenever i'm free and share with you some makeup related.
I'm using NAKED PALETTE for all the eye shadows, But as usual you can use your own similar color or you can create your own different colors. I created a night look more to clubbing kind of look.
I just need my NAKED PALETTE and a light silver eye shadow from 120 colors palettes. I didn't capture the items, forget and lazy. My apology. I just grabbed a photo from the net and insert an arrow for the one that i'm using.

I'm only using 'Virgin', 'Smog' and 'Darkhorse' from this palette.
Before you start applying any layers of cream or eyeshadow, never forget to prime your eyelid to prevent from creasing especially to those who have a oily lids like me. Trust me, it creases free.

I applied 'Smog' on to my inner and outer lid, up to my crease and leave the middle one empty.
Then i applied light silver on to the middle lids where's it left empty earlier on. Blend the line between bronze and silver to make it more fading effect instead of two different color.
I used 'Virgin' as my highlight cause as I've said, i want it to look dramatic. If you want to tone down the bright shimmery colors, you can apply your foundation powder as your highlight. Blend 'Smog' and 'Virgin' together till there'll be no harsh lines.
Lastly, using a tapered brush, apply 'Darkhorse' onto the outer crease in C shape back and forth.

Individual thickness of eye liner. As for me, i make it thin cause i want my false lashes to be seen as well as my liner.

There, i'm done. Please wait to my next update. To the ladies who are interested in getting the items that i'm selling, kindly private message me at my FACEBOOK.
xoxo wanie.
Sunday, May 6
B L U E S M O K E Y
[ Ladies, you should try Liese New Aerosol Hair Sprays that recently launched. It's a Super Hard Hair Spray & Liese Free Arrange Hair Spray lets you creates light & air hairstyles easily just by spraying and scrunching hair! To the ladies who loves create dramatic hairstyles should check this out at Watsons! ]
I got so bored that i do another look to share it with you. I got no idea what simple look i should do until i browse through my make up and i saw MAC eye shadow in 'flashtrack' that i didn't use for quite a long time. So i thought why not i make a simple smokey blue.
Bare with my unprofessional photos. I couldn't capture them perfectly. The color didn't pops really well in pictures due to the brightness of my lamp. If i were to avoid using lamp, it look so dark. sigh.

Products that i used :
- MAC Prep + Prime
- MAC 'Brun' & 'Flashtrack' eyeshadow
- MAC 'Blackground' painpot
- Rimmel mascara and eyeliner
- Essence 'Blockbuster'

I apply 'Blackground' paintpot onto my eyelids and stop right underneath my crease after i primed my whole eyelids using my ring finger.
Using flat brush, apply 'Flashtrack' on top of 'Blackground'. Then i used 217 blending brush and blend the harsh lines away.
I then used a dome brush and apply 'Brun' right on to the crease and blend together in circular motion. Not for gotten 'Blockbuster' as a highlight.
.jpg)
Since I've got nothing else to do, i decided to doll up myself with adding falsies on top and bottom lashes as well.


Oh well, hope you guys like the look I've did. Will update more of my clothing sale real soon. Gotta questions ? Feel free to ask me at my formspring on the left bar. (;
xoxo wanie.J
Thursday, May 3
B L A C K S M O K E Y E Y E S H A D O W
I'm gonna share with you how i did my smokey eye look. I don't know if my phone camera is the problem that my brown eye shadow blending can't be seen or it was just me who don't know how to applied those cause the pictures that i'm going to show you couldn't see the details clearly. sigh. Wouldn't want to blabber much, lets begin.
Products i used:
- Urban Decay Primer Potion
- MAC 'Blackground' Painpot
- Naked Palette
- L'Oreal Collagen Mascara

I first start out with priming my whole lids then i apply 'Blackground' painpot as a black base at eyelids and stop right underneath the crease. And slightly blend the harsh lines. (I ever dapped the black eye shadow without any base, it creased. A line between of my eye lids. Even it creases only a line but it's damn obvious la. Cause it's black what ! So embarrassing !)

Now i can start applying black eye shadow on top of the black base. Again i blend the harsh lines away. Smokey eye look is all about blending !
Before i apply brown eye shadow on to my crease to make it soft and smooth looking, i used a foundation powder and apply it on my brow bone as highlighter.
Blend. Blend. Blend. Blend. Keep blending till i there's no more harsh lines. ( Even there's still in the picture. sigh. ) You can simply do retouch and blend it again if you don't feel satisfy.

There it is ! My final touch up, it look so dark in reality but so light in photos. Hmmm ..
Oh well, Will post another look soon ! See ya !
 xoxo Wanie.J
Products i used:
- Urban Decay Primer Potion
- MAC 'Blackground' Painpot
- Naked Palette
- L'Oreal Collagen Mascara
I first start out with priming my whole lids then i apply 'Blackground' painpot as a black base at eyelids and stop right underneath the crease. And slightly blend the harsh lines. (I ever dapped the black eye shadow without any base, it creased. A line between of my eye lids. Even it creases only a line but it's damn obvious la. Cause it's black what ! So embarrassing !)
Now i can start applying black eye shadow on top of the black base. Again i blend the harsh lines away. Smokey eye look is all about blending !
Before i apply brown eye shadow on to my crease to make it soft and smooth looking, i used a foundation powder and apply it on my brow bone as highlighter.
Blend. Blend. Blend. Blend. Keep blending till i there's no more harsh lines. ( Even there's still in the picture. sigh. ) You can simply do retouch and blend it again if you don't feel satisfy.
There it is ! My final touch up, it look so dark in reality but so light in photos. Hmmm ..
Oh well, Will post another look soon ! See ya !
Friday, April 27
C U T C R E A S E
I did golden cut crease green-ish eye shadow yesterday. so i wanna share with you ladieees !
The products that i'm using:


The products that i'm using:
- Eye shadow base ( Urban Decay Primer Potion)
- Cream duo eye shadow ( ELF )
- Black liquid and Pencil liner ( MAC )
- Medium green, Black, Beige & gold eye shadow. ( 120 & NAKED palettes )

You don't have to use the exact products obviously.... you can use something similar.
I started off with primed my whole eyelids using Primer Potion then i applied ELF duo cream eye shadow in pink-ish white on my eyelids. These 4 pictures will look messy with the eyebrow and ugly eye shadow but it'll look good when everything done. Hope you don't mind.

1. I used black pencil liner and draw V at outer corner, just between the crease. And line the upper lash. Don't need too precise cause you'll be smudging it later on.
2. Apply Medium green eye shadow above the black and beige color as the highlight. Then you can proceed blending the green and beige.
3. Then apply Shimmery gold on the eyelids ! Not too worry if you applied little too much till it touches the black cause you can always touch it up.
4. Draw a thin line of liquid liner then i start to wing it up when it reaches middle. Up to you on how thick you want it to be.

( Picture above is not been edited. )This look that i did kinda dramatic so i added thick false and line my waterline using black pencil liner and gold liquid liner at inner waterline as well as my tear duck to make it look more dramatic.
But this look is not gonna complete without foundation, concealer, loose powder, contour, blusher & lipstick isn't it?


So now i find it better and complete with the face make-up on. Well, i hope you ladies likes it. See ya !
xoxo Wanie.J
Monday, April 23
S H A P E E Y E B R O W
Hey ya all ! I've been on my desktop computer since 1.48am with an huge intention to just update my blog but ended up browsing through Polyvore website. Selalu macam ni. Benci ahh!
I would like to share with you on how i do my eyebrow. I don't usually conceal on top and underneath my eyebrow unless my growing eyebrow could obviously seen, Or maybe if i want my eyebrow to be perfectly shaped on that day.
I don't have a perfect eyebrow, i admit. Even if i tried to pluck it equally, one will still be higher than another. As been told by mum, i shaved the middle part of my eyebrow which i think more on the right side. Then cannot grow properly already! Cacat kening.
Lets get started ! Here's the look of my eyebrow with nothing on it. It's kinda hairy tho'.

I only used 2 things which are:
.jpg)

.jpg)
I would like to share with you on how i do my eyebrow. I don't usually conceal on top and underneath my eyebrow unless my growing eyebrow could obviously seen, Or maybe if i want my eyebrow to be perfectly shaped on that day.
I don't have a perfect eyebrow, i admit. Even if i tried to pluck it equally, one will still be higher than another. As been told by mum, i shaved the middle part of my eyebrow which i think more on the right side. Then cannot grow properly already! Cacat kening.
Lets get started ! Here's the look of my eyebrow with nothing on it. It's kinda hairy tho'.

I only used 2 things which are:
- Eyebrow kit ( Benefit )
- Cream Concealer ( MAC )
.jpg)
If you don't have eyebrow kit, eyebrow pencil will do as long as it's sharpen sharp to draw a line.

1. Use a hard angle brush, dipped it on the wax and draw a top and bottom line. You can draw a thick or thin eyebrow as you wish cause you'll conceal after that.
2. Swiped a eyebrow blending brush on the eyebrow powder and fill in between both lines. It's alright if your eyebrow are too dark cause you can always use a eyebrow hard brush to lighten it up.
3. If it's starts to get messy and smudgy, you can use any cream concealer and conceal on top and underneath your eyebrow. You can use any concealer brush but i'm using angle brush as it's easy to control.
.jpg)
Now you are done! A clean eyebrow that some people might thought that you are too hard working to pluck your eyebrow every single day ! Nyahahahaha! Merepek!
Update soon!
Subscribe to:
Posts (Atom)